Probing sequences provide a variety of ways to monitor and improve automated milling performance.
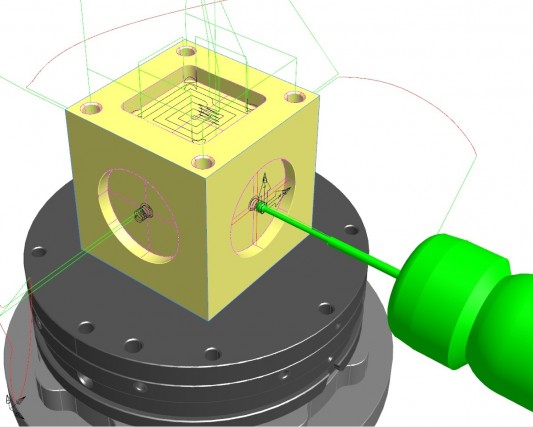
Delcam has added new probing capabilities to the newly released 2013 version of FeatureCAM. The ability to incorporate probing sequences into CAM programs makes it easier to undertake unsupervised production operations by allowing automated checks to be carried out before, during and after machining.

Probing paths can be generated for five feature types: pockets, obstructed pockets and webs; inside or outside corners; bosses, bores and obstructed bores; radial bosses, bores and obstructed bores; and single surfaces. All of the resulting probing paths can be simulated and collision checked on the computer in the same way as cutting paths.
The new probing options can be used in a variety of ways. Before machining, sequences can be created to check that the expected part and fixture have been loaded, and that they have been placed in the correct orientation. The position of the part can be confirmed and fixture offsets introduced if required to compensate for any errors.
In a similar way, the amount of excess material can be detected on near-net shapes, such as forgings or castings. Offsets can then be introduced to give a more even distribution of the material that has to be removed, so improving machining efficiency.
Additional probing routines can be introduced at any stage during manufacturing. For example, as a cutting tool wears, it could be leaving too much material on the job. This trend could be monitored by regular probing of the parts being produced and a tool change introduced automatically as the material being left came close to the target tolerance. Alternatively, the tool offset could be adjusted to compensate for the reduced size of the cutter.
Similarly, critical features could be inspected immediately after they had been created to check whether too much material had been removed. If the parts were found to be outside tolerance, they could be scrapped immediately, rather than carrying on with machining and waiting for the results of an inspection at the end of the complete process. For example, if a crucial bore within the part had to be made to a particularly accurate tolerance, this could be machined and checked first, before continuing with the other, less critical, operations.
Probing routines can also be added for checking at the end of the process. While independent inspection on a separate measuring device would still be needed, the initial check on the machine would highlight any parts well outside the required tolerance so eliminating wasted inspection time. In some cases, it might be possible for the independent inspection be undertaken on intermittent parts to confirm the results from the probing on the machine, rather than on every part, again saving inspection time.


